Building a website is a no big deal today. There are lots and lots of technologies, frameworks, tutorials out there which will help you to build an awesome website for your business or for personal use. As I said there are lots of tutorials out there on the internet to build a website, then why am I writing another one? Answer is simple, this article is not about how to code a website, but it is about how to deploy and run a website so that other people can see it.
I am assuming that you have already coded your website and tested it on your local system and you are ready to get live as soon as possible. Let’s bring the best and easiest way of getting you live on the internet.
1. Get a Domain Name
If you already know why you need a domain it’s good and if you don’t –
On the Internet, your domain name is your unique identity. Any individual, business or organization planning to have an Internet presence should invest in a domain name. Having your own domain name, website and email addresses will give you and your business a more professional look. Another reason for a business to register a domain name is to protect copyrights and trademarks, build ccredibility increase brand awareness, and search engine positioning.
I guess this is the most difficult part if you haven’t already booked your Domain Name because finding an available domain based on your requirement is like finding a needle in the haystack. So let’s get a domain name first and for that, I would prefer NameCheap because of its intuitive dashboard, good service and very powerful control panel –
Just book a domain name preferably a “.com” for the international market and your own country specific like “.in”, “.co.in” for India. Don’t worry about settings now, after we will have all the necessary ingredients, we will revisit and setup everything to get you live.
2. Get a Hosting Service
After you have booked your domain name say “xyz.com” now you need a place where you can put your website content. It is basically called hosting and again there are a hell lot of ways to host a website and equal numbers of providers who offer such services. You may come across terms like shared hosting/VPS hosting/Cloud hosting and many such things, just don’t get confused by all these nasty terms, they all provides you a machine with some space on it and some horsepower (RAM/CPU) to run your website. Now shared hosting might give you less whereas VPS will give you more for more charge of course. So let’s again go with the simplest and the best approach and for that I would prefer Digital Ocean and reasons are:
- It’s simple and not at all confusing.
- Gives you a bare metal box where you can install any OS or server and do whatever you want.
- It starts with 5$ plan which gives you 512MB RAM and 20GB SSD. Wow! this is really really great.
To give you some more confidence about Digital Ocean, fossBytes.com runs on digital ocean’s 2GB droplet and serves more than 1 million page-views every month. We have also seen 600+ online visitors at any point of time and that’s really a very great deal.
3. Connect the dots
Since you have booked your domain name and opted for a hosting service at digital ocean, let’s connect all the parts and get your website up and live.
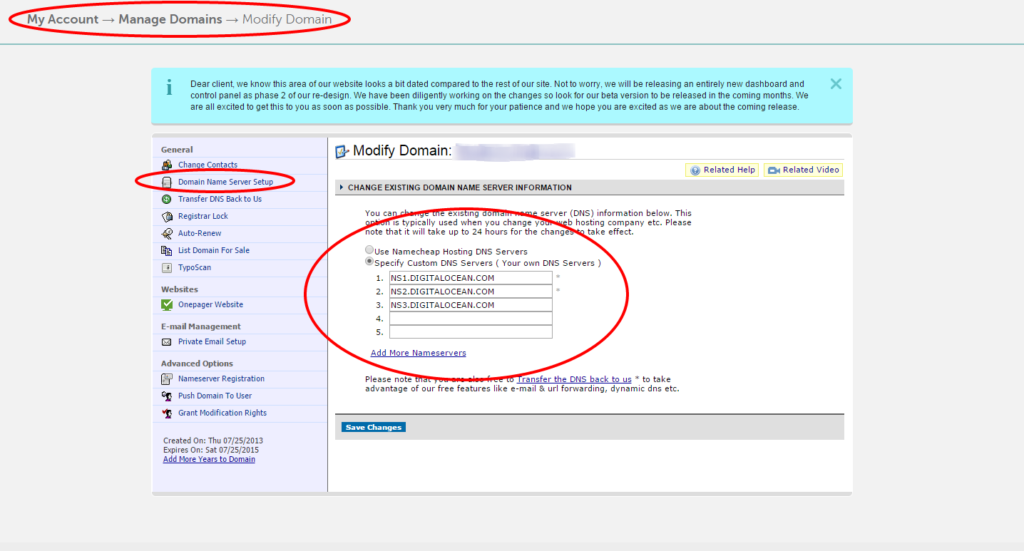
Modify your DNS entry
Go back to your Domain Name provider’s control panel and change the DNS entries given by Digital Ocean.
The DigitalOcean domain servers are:
- ns1.digitalocean.com
- ns2.digitalocean.com
- ns3.digitalocean.com
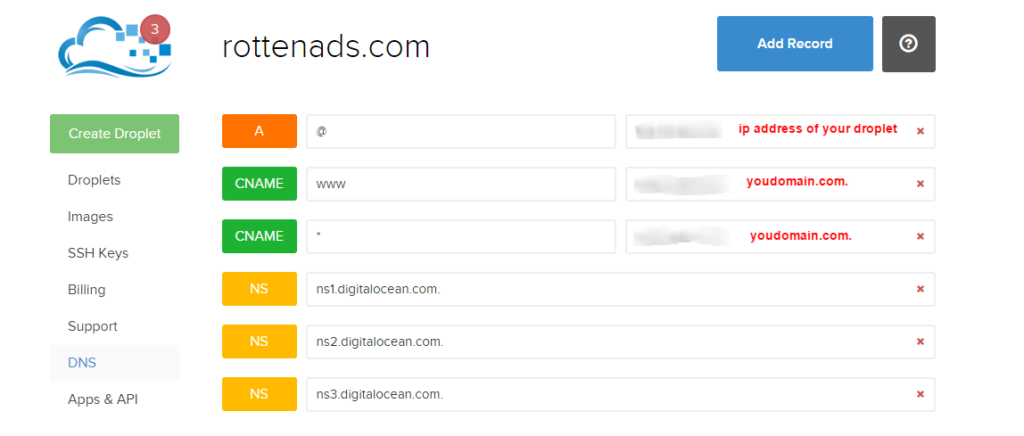
Modify your DNS settings at Digital Ocean
Open the DNS tab on your Digital Ocean control panel and add setting for your domain name –
That’s it, now your domain is pointing to your droplets IP address and you can install the web server and databases required for your web application to run and deploy your application.


0 Comments